Sunday, October 31, 2010

Baby in Pink

Baby Esther arrived safe and sound, early Friday morning. {October 29th @ 4:28am, 7lbs 14 oz, 20 3/4" long}.


I couldn't wait to take this cute pink hat to her and take some pictures....unfortunately when I went the the hospital on Saturday, I forgot my camera. {we did take some on Amy's camera and I will get them when they get home.}

Congratulations to Amy and her family! I will have to do double duty for the next few months while she recovers! {shouldn't be a problem!}.


Originally found HERE....but Redesigned without the top and just used the same color yarn. The flower is on a clip so when the hat is too small, she can still use the flower.
Photobucket

Thursday, October 28, 2010

The Last LINK

It's always good when your child is happy with his Halloween costume. This was a special request for this year.

It turned out great and he is VERY happy with it.

Do you know who Link is?? {he's from the video game Zelda}.


I started with 
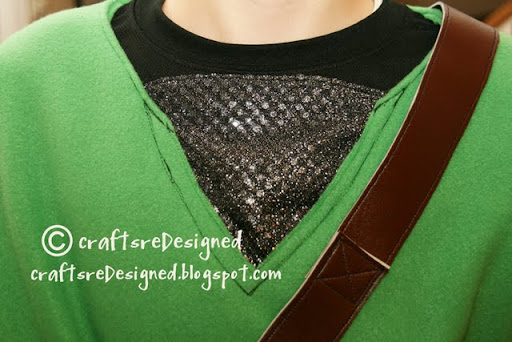
THIS pattern, I used the shape of the top without the points at the bottom. I cut it on the fold so there is no seam down the front. I used fleece so I wouldn't have to finish every edge. There are several different versions of Link, I used the simplest one I could find. he has a shirt under the green one that looks kindof like chain, so I added a "V" at the neck and on each of the sides to make it look layered with the chain fabric.


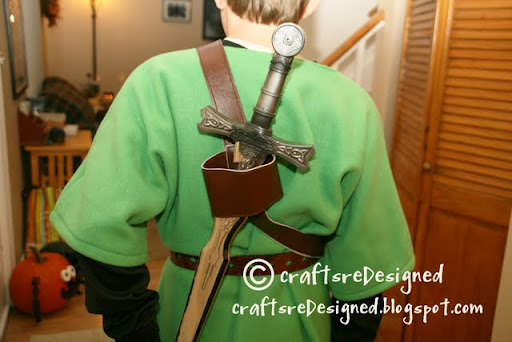
Then I used some leather like material and made a sword holder. {it doesn't work great, but it will work for a few nights!}. The sword is kind of heavy so it pulls the holder down.


I found this cute leather bag at Hobby Lobby and Tanner made it to go with his costume.


I used the hat from the same pattern. I used fleece with fusible interfacing. I just serged the edges inside, it worked perfectly. His only complaint is that I made him get his hair cut and now it's not long enough to look like Link. {sorry!}


....add some church pants, and a pair of boots from the thrift store and you get one HAPPY LINK!


Happy Halloween! Hope it's a GREAT weekend. Stay Safe!
Photobucket

Tuesday, October 26, 2010

It's never toooo late......

to make more Halloween crafts. It's almost a whole week before the "big day" and I just finished a few last minute Halloween projects. {some of them have been on my list since last Halloween!}

First up....Halloween Wall Hanging. {I just couldn't have the fall tree on the wall with the cute spider table runner.} Enter NEW Halloween wall hanging. Super EASY! I made a spider web in the middle square


then sewed squares all around the middle one...and added tabs at the top. I was done in less than 2 hours. total.


and the back is just as cute as the front.


then I made some towels {with fabric I bought last year to make towels!}


and last, I made some SUPER cute black pails with googly eyes for my visiting teaching sisters and filled them with caramel corn {recipe found HERE}


Hope you all enjoy your week of Halloween festivities. I know we will!

Photobucket

Thursday, October 21, 2010

Mini Fabric Pumpkins

After making some more fabric pumpkins for our craft group class I figured I would make a couple of these cute pumpkins.  They are not very big.  I found the idea on Family Fun crafts.  They are super easy and don't require much then a scrap of fabric, thread and a stick from outside.  I think my circle I began with was about 9 or 10 inches.  They turned out pretty cute.  I haven't glued the sticks in yet but they seem to be holding.  They used a plastic bag to fill the pumpkins but I chose to use the stuffing I used to make our pumpkins.

Do you like them?  I sure do.  Although I need to stop making pumpkins and fall decorations, I am running out of room to put them.  I may have to look through what I have and get rid of some things.  Oh, well, it is so much fun to make things like this.

Photobucket

Monday, October 18, 2010

Another easy blanket project

I bought a remnant fabric at garage sale this summer.  It was the really soft yellow and white fabric in this blanket.  I then bought a remnant at JoAnn's of fleece of both white and yellow.  Then the other night I thought.  I want to make that blanket.  (I have been sewing like a mad woman since this baby is coming in 2 weeks and I wanted to sew some Christmas presents before she comes.)  This project was just one of those, "hey, I don't have anything hanging over my head projects and I want something easy."  So I cut the fabric into 9 inch squares and then serged it together with the flatlock seam on my serger.  It looks like this when you pull the fabrics apart.

I'm not sure if you can see how it looks but it is a really cool seam.

I then took that same stitch and ran it all around the blanket.  I had to repair a couple of places with a zigzag stitch after it was all done but I have washed it and the seams are staying together.  It is so soft, my daughter thinks it is hers and walked around with it for a couple of hours after I made it "petting" it over and over again.  I hope that she can share it with her new sister.  (She is 5 after all.)

I think I made it in less then an hour.  It is another take on the rag quilts that Liberty loves to make.  Except you don't have to clip any seams. 

Here are a couple more pictures of it.

Photobucket

Thursday, October 14, 2010

Cute {EASY} Magnets

I had to come up with a cute {easy} project for the Beehive girls in our Stake {church girls 12-13}. My mom had a set of these super cute magnets in the Young Women value colors. We made them with about 30 girls. It was fun and super easy. {I forgot to take pictures that night, so I made some more and took pictures for you! You're welcome!}

First start with these marbles with flat bottoms. {I got them at hobby lobby in the floral department}


Then punch out any kind of paper....colored, patterned, flowers, anything you want...you could also use pictures instead of paper. {I used a 3/4" circle punch}


We then used this Glossy Accents glue {also from Hobby Lobby in the scrapbook adhesive isle}. I put a thin layer on the marble and then pressed it firmly onto the paper. Press down to get all the bubbles out and spread the glue evenly on paper.


Then put a thin layer of glue on the magnet and press onto the back of the marble. And that's it! Super EASY! Let dry for 15min-1hour. It dries really fast. We were able to let the girls take theirs home in about an hour.


I took mine home and sanded the extra paper off the bottom of the marbles...but I'm a little OCD.

You can make more in the value colors....or flowers or halloween....or stars...or a million like I did!


Photobucket

Monday, October 11, 2010

Baby Burp Cloths

I am getting really close to having this baby.  Actually unless she comes early I only have 18 days left until my scheduled c-section.  So I have been doing a little bit of nesting.  I really don't need cute burp cloths but I saw some on the web and decided that I would make some.  I really should be finishing up other projects that I need to get done before she gets here but these are super easy and took just a little bit of time.  It also used up some of my scraps and ribbon I have been collecting.  I bought the cloth diapers at Walmart and then cut the fabric to cover the center section.  Because I am lazy I just pinned on the fabric and then when I added the ribbon or ric rac I just sewed across both hoping I would catch the fabric underneath.  I folded the ends in to make it look nicer and serged the edge under the ribbon to help it be more finished.

Here are some of the other ones I made.  I just love some of the color combinations.  Although I really loved my collection of brown, pink and white.  (Please ignore that I didn't iron them before I took the picture. I figured I would probably have to wash them before I could use them and so what's the use of ironing them?)
Aren't they cute?  I love that I have so many cute options when this baby spits up.  Which if she is like her siblings we will need more then this set of 12. :(
Photobucket

Friday, October 8, 2010

Wooden Names By Amy's Sister Ariane


I saw these on my sister's personal family blog and thought  "I want to feature those on my craft blog."  They are soooo cute, and will be wonderful for the kids rooms when they are able to get into their next home.  Right now she is living with my mom while her husband finishes basic training.  He will be done next week and she is coming to visit me after his graduation.  I am super excited.  But enough about me and my family. 

Here is basically what she emailed me about how to make them:
Kate's I did with Modge Podge and just tore up pieces of paper and glued them on the letters. I found the letters at Michael's, already painted white, with the stands. Otto's I just cut out the letters in the paper and glued them on. Kate's flowers are just wound on the pegs and Otto's wooden truck and helicopter are glued on. I found the truck and helicopter at Michael's also and painted them myself. It was a really easy job. Took me about an hour once I started, minus the time drying. The kids love them.

I'm pretty lucky to have creative sisters.  They always inspire me to want to try something new.  Hope these cute name signs make you smile.Photobucket

Saturday, October 2, 2010

Beautiful Blessing Dress

It's done (well almost).  I need to find some buttons and serge the inside of the sleeves and then it is done.  It has turned out so beautiful.  I love it.  I just can't take a picture to show you how beautiful it is.  I have worked long and hard on this, hoping to get it done before the 1st of October and I'm proud to say except for a couple of last minute things it is done.

Here is a closer picture of the top.
I love the pintucks.  They turned out perfect.  I chose to move them closer together then in my original trial run.  I ran the diagonal lines at 3/4 of an inch.  The sleeves are just soo cute all puffy and fun.  The lace just adds the finishing touch.

Here is a close up of the hem.  I bought this lace at a garage sale and it is just so pretty.  I love the 5 rows of pintuck that I added.  It just gives it that finishing touch.

Can you tell I love it???  I am so proud of myself even more so since it isn't the day before she is being blessed.  Here is the link to the original post if you want the pattern I used.  I got my inspiration from Homemade by Jill for the pintuck.
Photobucket

LinkWithin

Related Posts with Thumbnails